A few days ago Rob had a student e-mail a question about a way to add a character or image element to the end of every article in a document sometimes called a slug or end-it. Fortunately I have been spending a decent amount of time using GREP lately and with the help of renowned designer/trainer Michael Murphy, and a neat little video by David Blatner have figured out a solution to the problem!
First of all, what is GREP? Well, GREP stands for General Regular Expression Print. That's on the quiz by the way! Regardless of what it stands for, GREP is a pattern matching utility new in InDesign CS3 that allows you to perform complex find/change queries on text in your document that would have taken many many steps in previous versions and in other programs. GREP has been around for literally decades in the UNIX world and now creative professionals can make great use of this tool as well.
I'm going to begin with a basic InDesign document to demonstrate but this can work very easily in an entire document.
What I've done is created a basic page with a few stories to demonstrate. The first thing you need to do is go to Edit>Find/Change in InDesign to bring up the Find/Change window and click on the GREP tab at the top of the window. Now I looked high and low under the "Special Characters for Search" section to the right of the Find What field and couldn't find anything that allowed me to search the end of every story. However the regular expression that does this is .\Z. So in the Find What field, type (.\Z) - this is a capital Z and you need to include the parentheses. The parentheses will help us later on. After typing that text in the Find What field, click the find button several times and you'll see that you're cursor highlights the last character of every story in your document. Pretty cool!
Now, in the change to field you want to enter $1 and then the character that you'd like to insert at the end of each article. An easy way to do this is to set your character in a separate text frame to the size and font that you want to use. Then copy it to the clipboard. Now in the Change to: Field type $1 then click on the @ symbol to the right of the Change to field and choose Other>Clipboard Contents formatted. So you're Find/Change window should look like this:
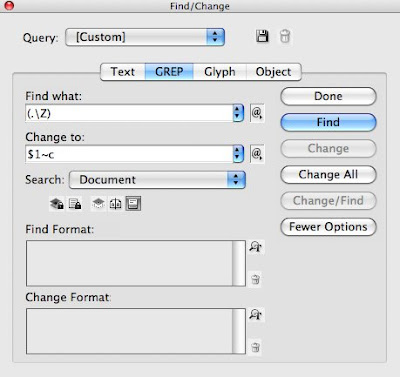
The $1 basically takes what is in parentheses (the last character of your story) in the Find field and regurgitates it in the change so that you don't actually replace the found text. Click the change all button and you'll see that your character has been added to the end of every article in your document! If need be you can put a space after the $1 in the Change to: field so that a space is added in between the end of the story and the custom character.
 Chad Chelius
Adobe Certified Instructor, Adobe Certified Expert, AGI Training
Blog: The Chad and Rob Show
 Brenda Levos