Monday
Mar172008

Got an old Pantone book and some time to kill?

Check this out...A reproduction of Édouard Manet's 'Bar at the Folies Bergere' made entirely of old Pantone chips.
Over 5,000 unused chips were painstakingly color matched and and stuck down over four long nights, and acted as center piece for a boozy party.

manetone1.gif

manetone3.gif

 To see the original artwork http://en.wikipedia.org/wiki/A_Bar_at_the_Folies-Berg%C3%A8re

Artist site: http://www.timfraserbrown.co.uk/ 

Monday
Mar172008

Get a GREP! (part2)

In my previous post you saw how easy it is to use GREP to put a character at the end of a story. Something like this would require a significant amount of time in the past and would also open up the potential for human error.

One problem with the method used in part one was the fact that the end-it character was entered into every single story within your document including captions and headlines. Probably not what you would want. One solution is to select only the frames on your page and then in the Find/Change dialog box, set the Search to Stories. This would put the character only inside of the frames that were selected. Useful for a single page but not in a longer document which would require you to select every frame on each page. Not to mention that you can't select items across pages in InDesign!

A much more robust solution involves the use of Paragraph Styles in your document. When I set up this document, I created several paragraph styles to apply formatting to the text. As you can see, I've created a Body, Caption, and Heading style.


Now, following the same steps as in part 1, go into the Find/Change dialog box and set everything as before. This time however, click on the More Options button in the upper-right corner of the dialog box to display additional options. If you see the Fewer Options button, you're already where you need to be. Click on the "Specify attributes to find" button in the Find Format section of the dialog box and in the Find Format Settings dialog box, choose Body or the style in which you want the end-it mark to appear. Click OK then click the Change All button. Voila! All of your end-it marks should appear in only the stories that contain that style. Sweet!


The Specify attributes to change button.

Keep checking back! In part 3 we'll perform this operation with an in-line graphic which is useful when the end-it mark isn't a font but an actual graphic that needs to be placed at the end of every article.

chad.jpgChad Chelius
Adobe Certified Instructor, Adobe Certified Expert, AGI Training
Blog: The Chad and Rob Show


Sunday
Mar162008

2X the love.

Mosaiko.jpgI loved this site so much I am posting it twice, once on the home page and then again in the Websites We Love category.

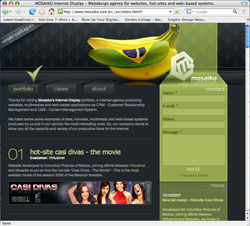
One of the things that web designers stuggle with is how to make a webpage more dimensional. How do you add depth to something that is so flat, especially when you have do accomodate navigation on multiple pages or you are working with a templated site. I thought this site did an excellent job of all of that. The textured background in the header, and the way the stripe comes down and becomes the right navigation, all while utilizing a vanishing point and placing the banannas so that they slightly overlap the right stripe with their little reflection and the shadowing and interaction with the 3D logo.

If you break down the page, you could easily achieve this kind of a look with one large header image, and then a standard template for the lower portion. As you move from page to page, you would need to make sure that you move the checkmark above the navigation tabs.  So with three different header images, you could achieve a similar look. Note how the bottom 2/3 of the page are still very flat looking, but the header certainly makes the whole site.

Visit the Mosaiko site at http://www.mosaiko.com.br/_en/index.html?r